In this article, we will go through the steps on how to automatically empty trash on Mac. As a Mac user, you may have noticed that your trash bin can quickly fill up with unnecessary files and folders. If left unchecked, this can not only take up valuable disk space but also slow down your system. One way to combat this issue is to set up your Mac to automatically empty the trash.

Introduction
The trash bin on Mac is a useful tool that allows you to store files and folders that you no longer need. However, over time, the trash can fill up and take up valuable disk space, slowing down your system. By setting up your Mac to automatically empty the trash, you can ensure that your system stays clutter-free and optimized. In this article, we will discuss various methods to achieve this.
Read More: 3 Ways to Remove Background From Images on Mac
Why Should You Automatically Empty Trash on Mac
There are several reasons why you should set up to Automatically Empty Trash. Here are some of them:
- Saves disk space: When you delete files and folders, they are not immediately removed from your hard drive. Instead, they are moved to the trash bin, where they continue to take up disk space. By setting up your Mac to automatically empty the trash, you can reclaim this space.
- Improves system performance: A cluttered trash bin can slow down your system by taking up valuable resources. By emptying the trash automatically, you can ensure that your system stays optimized.
- Prevents accidental file restoration: If you do not empty the trash regularly, you may accidentally restore files that you intended to delete. By automatically emptying the trash, you can prevent this from happening.
How to Set Up Your Mac to Automatically Empty Trash
There are several ways to set up your Mac to automatically empty the trash. Here are three methods:
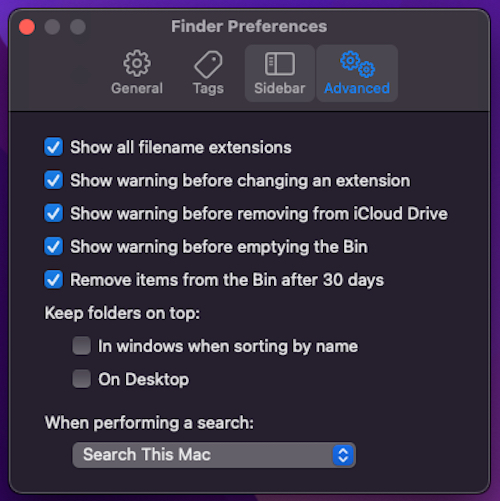
Using the Finder Preferences
- Open Finder by clicking on its icon in the Dock.
- Click on the “Finder” menu in the top-left corner of the screen.
- Select “Preferences” from the drop-down menu.
- Click on the “Advanced” tab.
- Check the box next to “Empty Trash securely.”
- Select “Immediately” from the drop-down menu next to “Remove items from the Trash after.”
- Close the Finder Preferences window.
Your Mac will now automatically empty the trash whenever you delete files or folders.
Using Terminal Commands
- Open Terminal by clicking on its icon in the Utilities folder.
- Type the following command: defaults write com.apple.finder AppleShowAllFiles TRUE
- Press Enter to execute the command.
- Type the following command: killall Finder
- Press Enter to restart Finder.
Your Mac will now show hidden files and folders, including the “.Trash” folder. 6. Type the following command: sudo rm -rf ~/.Trash/*
- Press Enter to execute the command.
- Type your admin password and press Enter.
Your Mac will now automatically empty the trash every 30 days.
Using a Third-Party App
There are several third-party apps available that can help you automatically empty the trash on your Mac. One popular app is “Hazel,” which allows you to set up rules for managing your files and folders. Here’s how to use Hazel to automatically empty the trash:
- Download and install Hazel from the developer’s website.
- Open Hazel by clicking on its icon in the Applications folder.
- Click on the “+” button to create a new rule.
- In the “If” section, select “Kind” and choose “is” from the drop-down menu.
- Select “Folder” from the second drop-down menu and type “/Users/<username>/.Trash” in the text box.
- In the “Do the following” section, select “Move to Trash.”
- Click on the “Save” button to save the rule.
Your Mac will now automatically empty the trash whenever you delete files or folders.
Tips to Manage Your Trash
Here are some tips to help you manage your trash more effectively:
- Regularly empty the trash: To keep your system optimized, it’s a good idea to empty the trash regularly. You can do this manually by right-clicking on the trash icon in the Dock and selecting “Empty Trash,” or by using one of the methods described in this article.
- Use the “Secure Empty Trash” option: If you want to make sure that deleted files cannot be recovered, you can use the “Secure Empty Trash” option. To do this, hold down the “Option” key while clicking on the “Empty Trash” button in the Finder.
- Be careful when deleting files: Before you delete a file, make sure that you no longer need it. Once a file is deleted, it cannot be recovered unless you have a backup.
- Use a backup solution: To prevent data loss, it’s a good idea to use a backup solution, such as Time Machine or a cloud-based service like iCloud.
Conclusion
Setting up your Mac to automatically empty the trash is a simple but effective way to keep your system optimized and free of clutter. In this article, we have discussed three methods to achieve this, as well as some tips for managing your trash more effectively. By following these steps, you can ensure that your Mac stays fast and responsive.
Read More: How to Convert WebP Images to JPG on Mac
FAQs
- Can I recover files that have been emptied from the trash?
- Once a file has been emptied from the trash, it cannot be recovered unless you have a backup.
- How often should I empty the trash?
- It’s a good idea to empty the trash regularly, such as once a week or whenever it starts to fill up.
- Can I set it up to Automatically Empty Trash at a specific time?
- This is not possible using the built-in options in macOS, but you can use a third-party app like Hazel to achieve this.
- Will emptying the trash affect my external hard drives?
- Emptying the trash only affects files and folders on your Mac’s internal hard drive. If you have files on an external hard drive that you want to delete, you will need to do so manually.
- What should I do if I accidentally delete a file?
- If you accidentally delete a file, you may be able to recover it using a backup or a data recovery app.


